Monday, August 24, 2015

Madders and Blues

After months and months of being "in the hoop" as we say, I am happy to say this quilt is now finished! I completed the quilting last week, finished up stitching the binding on yesterday, then promptly threw it in the wash.


Here it is above, draped over the porch rail for its first photo op, in the diminishing afternoon sunlight.


These taken this morning, late sunrise. I wanted to get the true colors, which is more difficult to achieve indoors.


I learned a lot making this quilt. First of all, pay attention to what you're doing. For instance, like how you cut the setting triangles, in order to avoid having long seams on the bias like I had. In the end it turned out fine, but it took a little manipulating to get it "square" if you know what I mean. I need to not be in such a hurry and to be more mindful. Although I have to say, I do like the way those stripes look, going at an angle. 

(Learn more about the construction of this quilt and how I solved the bias issue here.)

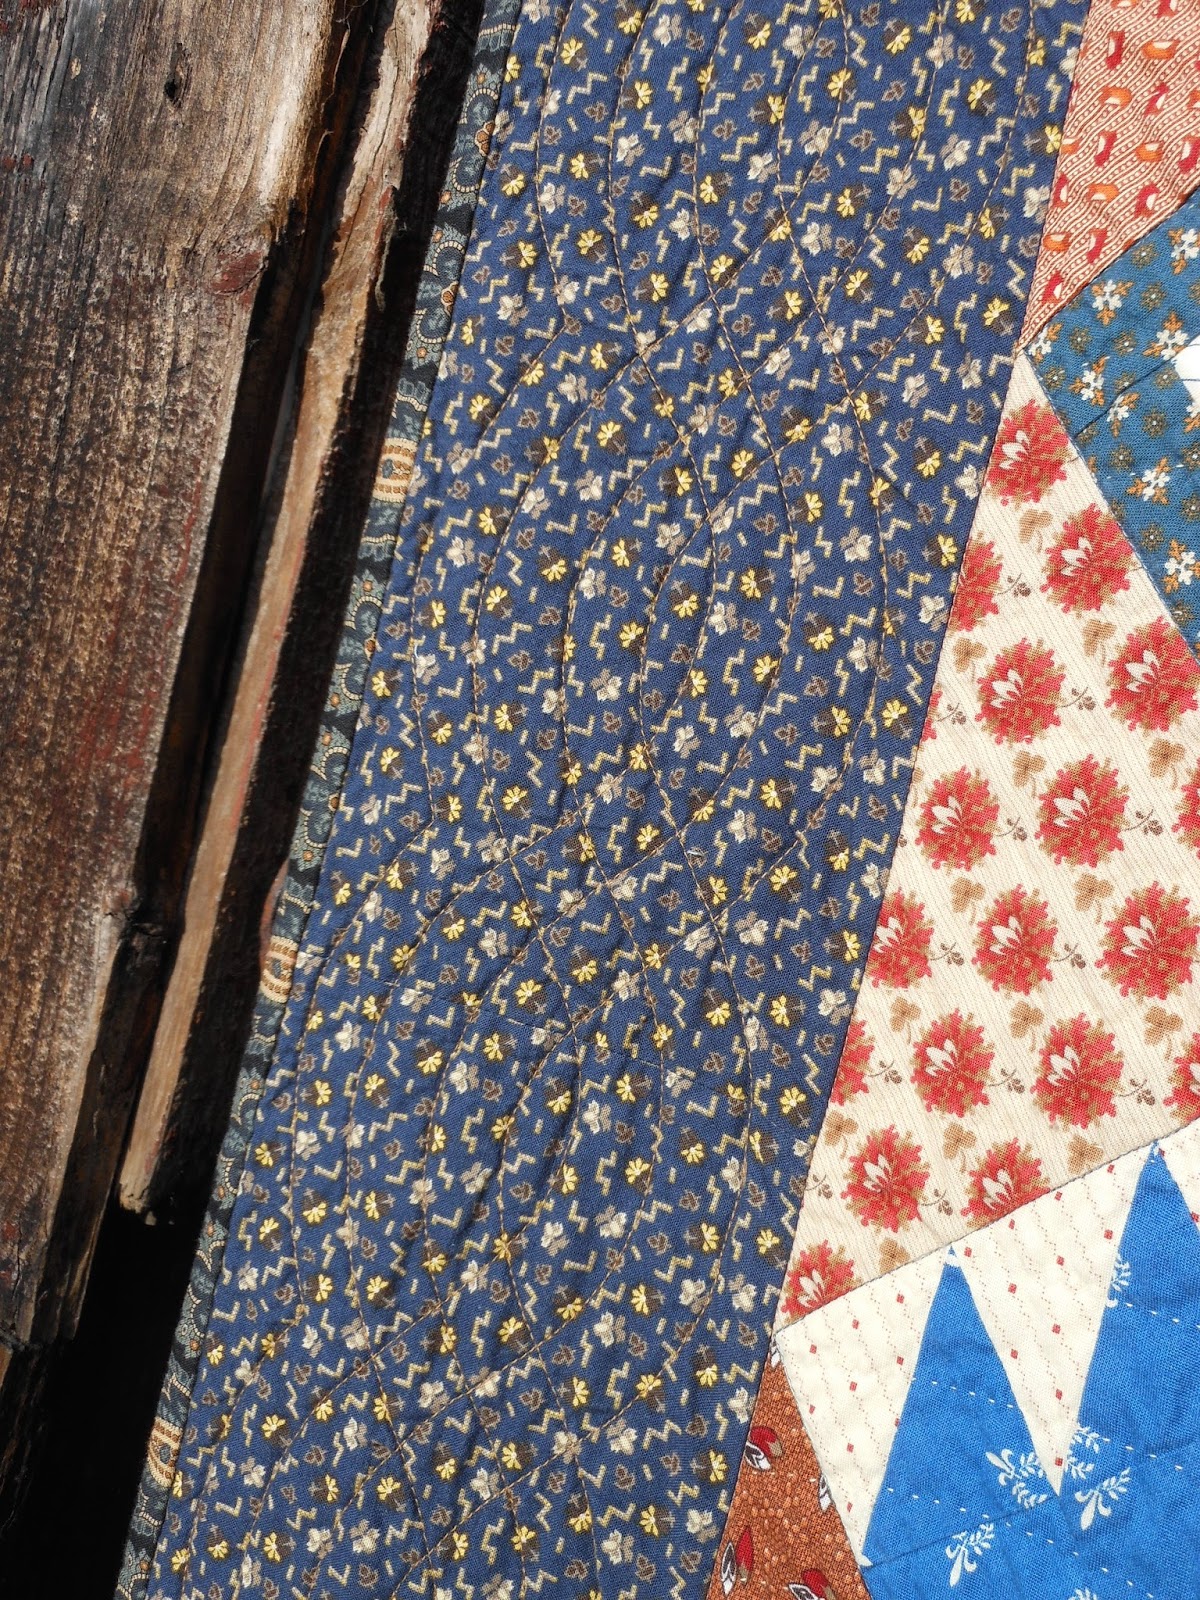
I experimented with some machine quilting techniques, some successful, some not so much. I first tried machine quilting gentle arcs, but I couldn't quite get the thread color right and no matter what I used the thread looked like it was just sitting on top of the blocks, which I felt detracted from the design of the blocks themselves (see elaboration here).  Then I tried some big-stitch quilting in the blocks which killed my hands (another false start here). I went back to the gentle arcs idea, and ended up plain old hand quilting them, which I think was the best way to go. But like I mentioned, it took a very long time.


For the borders I wanted cables, but unlike in the body of the quilt I wanted the quilting to show up more as a design element.  The most effective solution for the top and bottom borders, I felt, was big-stitch quilting in rust. 


A huge help was learning the proper needle to use for perle cotton, thanks to Shawn at The Rusty Crow Quilt Shop, who turned me on to the Bohin Chenille needles. I used size 24, which slid through the fabric and batting with ease. Perfect! Thank you, Shawn!

However, hand quilting was definitely not going to show in the busy pattern in side borders, big-stitch or no. So I (boldly and somewhat nervously) decided to try quilting the cable with the walking foot* on my machine, using a contrasting color. I think it turned out pretty good for my first try!

You still have to look pretty close, but at least it shows

*a note about the acu-feed system on the Janome machines: this is really not a walking foot, but an even-feed foot, which is similar but not the same. It does not "hop" like a walking foot, and once you get three layers including batting under it, it tends to push the top layer a bit. Which can really skew your quilt if you're not careful. Word to the wise, if you are considering one of these machines.

Moving on... after I finished the quilting, I failed to come up with a single fabric choice for the binding, one which would look good on both the front and the back. In a brainstorm, I decided to try another new-to-me- technique: the double-sided binding. Digging around in my "patterns and techniques" binder, I found a page I cut out of a magazine once that described how to do it. It was most likely American Patchwork and Quilting, although I don't really remember.  I was going to try to do my own tutorial, but I got too bungled up in the process of trying to take decent photos and explain what the heck I was doing.

I hope they don't throw me in jail for posting this.


The only thing they don't tell you is how far away from the edge to sew the binding on. I did 5/8" which seemed to work.


 Pretty groovy looking, huh?


I couldn't resist taking this photo of the two-sided binding all stacked up.

BTW I used 100% bamboo batting, which washed up beautifully and supposedly does not crease. I'll be testing out the warmth factor as it makes its rounds in the rotation of lap blankies that I snuggle under every morning as I drink my coffee and read the paper, even in the summer. This one is just in time for Fall, and the weather is starting to cool a little.

To review, this is my arrangement of the 36 blocks made by six of us for a block exchange last year, which were taken from the Rosemary Youngs Civil War books, or the Farmer's Wife. I am looking forward to showing my completed quilt at our guild show in February, hopefully some of the others will be there too. (hint - you know who you are!)


Happy Quilting to all! 

Love,
Sandy


Sunday, August 2, 2015

Sisters Choice

I must be on a roll. This is the second top I've finished in a month!


Mostly made from a Jelly Roll, mostly Marcus Collection for a Cause. That made the fabric selection easy, anyway! I thought it needed the brown border. Which, as you can see, has a little "make do" in the lower right corner.

Meanwhile, I've got a few UFO's calling my name, which have been lingering far too long.

Onward!!

love,
Sandy

Saturday, July 25, 2015

Everyday Patchwork


Quilts by Cheri posted these blocks as a sew-along earlier this summer, and I got totally caught up in the fun. Easy, charming blocks... and only 25 of them. What's not to love?

While its not really my style to copy someone else, I have to admit I was heavily influenced by Cheri's color choices and lazily followed along with the color combos that she used in many of my blocks. I was not really in the mood for a lot of creative struggling, but just wanted to sew along and have fun. Besides... how can you go wrong with Cheri's choices? Look at her blog. Everything she does is wonderful!

Here are my blocks auditioning dusty blue as a setting and border. Not bad, but very similar to so many other quilts I've made, and some still in the works. I wanted something different.

I have to admit, the dull grays Cheri used to set her quilt really appealed to me. Alas, I had nothing in that palette. Well The Old Country Store must have been listening, the next thing you know I got an email announcing their sale on Marcus Fabrics Basics, Borders and Backgrounds - which include some nice dull grays and browns. I picked out a few pieces, and a couple days later I had the setting fabric for my blocks.

Here's my first try-out. Nice.. but kinda boring.


I got the idea of red cornerstones, and liked it much better. I also wanted my quilt to be rectangle rather than square, so I added several more blocks of my own.


Then I got this idea, which elongates it even more, and provides a little more visual interest.  But the side borders needed something. I thought I might do some big-stitch quilting in red ...


so I squiggled some red perle cotton down the side to see how it might look. Trouble is, you can't really see it unless your up close. It needed to be thicker. Like a vine, or a rope. Which would mean (insert groan) the "A" word. Applique. Which I avoid like the plague.

But I decided I really wanted to try the red rope idea, so I was determined to figure out how to do it. 


Fast forward ... I figured out how to make my rope, using some leftover bias binding from a few hundred projects ago. Its basted down for now, but I'm still not sure its exactly in the right position?

I may still add more of the darker border fabric on the sides, I don't know. Maybe just a charcoal binding will pull it all together. Still some playing to do.

Love,
Sandy


Friday, July 10, 2015

Comfort Quilts

At my quilt retreat last month, among other things, I completed two lap size quit tops, intended for wounded vets at the Palo Alto VA.


However, when I got home I learned my neighbor three doors down was gravely ill and not expected to make it. As quickly as I could, I finished up the above quilt and gave it to him. I don't know if he really "saw" it, as he passed away the next morning. However his wife now has the quilt, loves it, and its a nice memory for her and represents good wishes and love toward her late husband. Rest in Peace, Elias Alonzo. He was a good man.


Then I learned that another neighbor around the corner had come down with Multiple Myloma (that's the disease Tom Brokaw has) and is going through chemo, which we all know is no picnic. I quickly finished up the second quilt, above, and took it over to him a few days ago. Amazingly, he felt good enough yesterday to walk over and thank me for the quilt! This one is backed in flannel, so its nice and comfy. He told me he loves it and uses it every day.

As many of you know, I've been making "vet" quilts for a number of years, in honor of my dad, now deceased, who fought in WWII. It makes me feel good to think I'm giving some small measure of comfort to these men and women who have come home from battle, broken physically, mentally or emotionally, or all of the above.  I will continue to do this as long as there is a need, which doesn't seem to be ending any time soon.

That said, it felt really good to give these particular quilts to men that I know personally, and am now eager to make a few more just to have on hand, "just in case".  I say that because in February we lost our young neighbor across the street to complications from alcohol and drug abuse. I had no idea he was as sick as he was, until hospice was called in a couple weeks before he passed. I was very fond of this young man would have loved to have laid a handmade quilt on him during his last days, but alas I had nothing to give him and the time was too short to make one from scratch.

So this is now on my agenda:  more comfort quilts! The idea would be to make the tops (which are easier to store) and finish them when the need arises, which can be done in a few days time.

I have always felt strongly that these simple quilts, though not complicated, should be as beautiful as any quilt I might make for myself, or for a friend. For in fact they will be given to friends, or friends of friends, and I take pride in what I make and what I give. The same goes for the "vet" quilts, which I feel should be just as special, for anything else would be an insult to these men and women who have given so much.

OK, time to go sew!

love,
Sandy

Tuesday, May 19, 2015

Weekend Fun

I squeezed in a few hours of sewing time over the weekend, during which I managed to crank out lovingly create a few more of Cheri's Every Day Patchwork blocks. I'm still way behind, I think she's up to Block 18 or 19 by now. So I'm just about halfway caught up, and gaining... for the moment!


These are really fun! Totally self indulgent, I have to admit, as I have "a few" other things that really should take precedence, if you know what I mean. But these are like candy, or as they say, like potato chips as you can't stop at one.

Now here's where that bucket of scraps comes in handy. Especially when I discovered I happened to have a bag of ready-made 2" Triangle Squares, perfect to pick through for Block 10.


I also happen to have a basket of assorted leftover units in a variety of sizes, from which I pulled the larger Triangle Squares for this block, which was made entirely of scraps!


Too bad its a work day today, I'm itching to have a go at Block 11, which looks like it could be challenging.

Meanwhile, Gayle over at The Middle Sister has posted her blocks, as has Julie at JulieKQuilts. Give them a look.

Anyone else out there doing these?

love,
Sandy

Monday, May 11, 2015

What to do with an Empty Design Wall

Start something new, of course.

The following quilt is being motivated by housecleaning. See, I've had these pre-cuts sitting around for way too long taking up space, and I really needed to something with them, or otherwise get rid of them. I started by looking up things to do with a jelly roll and decided on the Sister's Choice pattern by Bonnie Hunter. These are what I've made so far:


The fabrics come from Collection for a Cause by Marcus. I started with the jelly roll, but I did have to pull from my stash for more lights and more variety. I managed to kit up enough more to make thirty blocks, which will make a decent size quilt. I also have a layer cake of the same line, which hopefully I can use up in a scrappy border when the time comes. All waiting to be worked on when I go to Dillon Beach next month, for my annual week-long quilt retreat with friends!  I do see that those "light light" ones may have to get tea dyed, or maybe reconstructed with different background fabrics...

Meanwhile I've been absolutely itching to start one of the current sew-alongs that are going on. Barbara Brackman's Stars in a Time Warp sounded pretty cool, so I went ahead and got started with block one:


and pulled fabric for several others:


I thought I'd make them 4" instead of 6, the point being a smaller quilt.

But I already got sidetracked by Quilts By Cheri's "Every Day Patchwork"  which has been calling my name - loudly - and I couldn't wait to get started making some blocks! Yesterday I made three...


...and as soon as I'm finished with this post, I'm going to go back in and make some more.

Now, God help me whenever Sheryl over at Temecula Quilt Co. gets her Summer Sampler sew-a-long started, because I'm completely seduced by the antique quilt she is reproducing and already ordered the kit.

What, am I crazy?? What is it with samplers, anyway? I just can't seem to get enough!

On that note, my sewing room is calling me....

love,
Sandy

Monday, May 4, 2015

New Look

Fun messing around with this!

I like the old wood background, but it does make some of the text a little harder to read. The big challenge was getting the links, etc. to line up with the fence boards. All in all, not so bad, I guess!

My little doll quilt looks a bit crooked up there....

Thursday, April 16, 2015

New Things (and a couple good tips)

I picked up this little Fiskars Rotary Cutter Set on sale at Joann's a few months ago, and promptly forgot about it.

Then when I was getting ready for my quilt retreat last month, I came across it, still in its original wrapping, and decided to throw it in "just in case".

Turns out, it was the absolute perfect tool to trim the small hourglass units for my Ohio Star blocks!  Did I mention it swivels? You can see a peek of the white base below the gray mat below.


The square ruler is 2 1/2" with the 1/2" clearly marked on two sides, as you can see. The tiny rotary cutter is sharp as all get out, and perfect for this small application.


See? Perfect hourglass units! 

Then a week or so ago I read a tip about using Curad Clear Tape on your rulers to keep them from slipping, so I thought I'd give it a try.


This is actually the Walgreens brand, but its the same thing. Sorry I was so excited to rip it out of its packaging and try it, I forgot to take a pix of the package! But I think you can find it, just look for "clear adhesive tape" in the bandage section of the drug store.


I taped two rows down the right side of my ruler, and a couple "corners" of tape on the other side. I'm still experimenting on where all to place the tape.


The tape is a little frosty, but you can still see the fabric edge and measuring lines clearly enough. And.. it really grips the fabric! No more slipping. Too bad I didn't have this when I was making those dozens of hourglass units (above) ! Anyway, thanks to whoever recommended this tape, and forgive me for not making a note of where I read it. My bad, as they say ~

And speaking of cutting mats, my several-year-old Olfa was getting pretty warped and raggy so I had to bite the bullet and buy a new one. The one I really wanted was one of those Martelli mats that cut like a dream, but those are well over $100 for the size I need at home and I just couldn't get myself to spring for one. I looked on Amazon to see if it were any cheaper (answer: no) but then I happened upon the Alvin mats, which are similar (tho not as pretty) at a fraction of the cost. The reviews were mostly good to excellent,  with one consistent complaint, which I'll get to. Anyway.. I took a chance and ordered one.

It came today!


btw its charcoal gray on the opposite side.


OK here's the caveat: its not "quite" 36x24 as advertized. They fudge a little at the edges, and the measurements are slightly off.  So don't buy one of these if you depend on the mat measurements being accurate. I never have, so this is not an issue with me.

The good news is, it performs like a dream. I am amazed at how easily my rotary cutter glides through the fabric on this mat! Of course this is only the first day, but I have high hopes it won't suddenly revert to horrible any time soon. Martelli, eat your heart out. 

BTW here's another little tip for ya.. in case you're wondering, that's a strip of waste batting wrapped around the handle of my rotary cutter. It makes it easier on my hand.

The "36x24" mat cost me a whopping $27. To qualify for free shipping, I threw in one of these handy little LED lamps:


I already had one I ordered as an "add on" a few months ago, and it really came in handy when we lost power - the same day it arrived, no less. I keep it on my nightstand, and the new one will go next to the bed in the guest room.


You just touch that little circle thingie, and you get light - lots of it - in three progressive brightnesses. They range between $10-15, depending on the sellers mood, I guess.

Anyway, I hope you enjoy the tips, and have some time to sew, which in my case is getting more elusive as time goes on!

love,
Sandy


Sunday, April 5, 2015

Indigo

What to do with a recently acquired handful of odd shaped scraps of Vintage Indigo?


I have enough here for at least one doll quilt.


First to cut some workable pieces.
I can get one 2  1/2 x 5" piece from each scrap,


to give me two 2 1/2" squares

cut into triangles, and did the same with some Vintage Shirtings of the same odd shape.


A little arranging resulted in a sweet little top. 


I wanted to make this look like an actual "old" doll quilt, possibly made by a child.  Some of the shirtings were stained and I decided that added to the look. Tying rather than quilting seemed right. I used embroidery thread, then roughed up the ends. Also didn't want nice crisp corners, so rounded them a little.


The hardest part was finding something for the binding that looked old. This is as close as I could come...

...which I cut at a weird angle so it wouldn't have a predictable repeat.

 First audition, on the wall of my sewing room


but I think its going to live here.

I don't think I quite nailed the "authentically old" look, but I'm happy with it none the less.

Check out everyone's Slow Stitching today, on Kathy's blog.

Happy Easter, everyone!

love,
Sandy


Tuesday, March 17, 2015

Restarting the Engines

What happened to winter?? I usually do most of my sewing during the winter months, but we didn't get any winter at all in California this year.  That's my excuse anyway, for being stalled for so long.

Meantime, I have a quilt retreat coming up soon, and as usual it seems like I spend more time prepping fabric ahead of time than sewing at the retreat itself. So I had to get in gear. Following are  a few of the projects I have lined up:


I'm in love with the Ohio Star, and have had in mind to make another Ohio Star quilt ever since I sold the last one. So far I'm thinking I might like the dusty green as my neutral.

I had several stars already kitted up in baggies, then in the last few days cut a bunch more, to equal around 25 blocks so far. I'll probably wait until I get these sewn up and start playing with them before I cut any more.

I've also had a new project in mine for quite awhile, ever since I acquired a huge bunch of mens ties (some silk, some whatever) a few years ago.

These have all been gently washed and deconstructed, with the exception of the hemmed ends which I'm afraid to take apart in case I figure out a use for them as-is, some day.

The plan is to start by cutting strips from the mid sections, then sew them down to a foundation.  Above is my prototype, 7"x7". My idea is to place them on point with black sashing. Its going to be a wall hanging, for above my fireplace, as I need something new in the rotation for that spot.

The last project - if I get to it - will no doubt make me crazy.

I'd like to make some sense of all my scraps! In the basket above are smallish strips. In the bin below the basket are boxes and bags of what you people call crumbs. Some rectangle, some triangle. Anything that's an odd shape gets thrown out. Sorry. I can't deal with it. My mind will only function within parameters of order and symmetry. I can't just grab and sew like many of you seem to be able to, I just end  up with a holy mess. So I'm thinking the only way I'll ever do anything with these is to organize them all into sizes, then try to sew them into something relatively orderly. I may not succeed, and I may go bonkers trying. They may end up in the trash. Or.. you may see a big scrap giveaway on my blog in the near future! Don't say I didn't warn you!

Meanwhile, here's the latest configuration of my Farmers Wife blocks:

I know I'll have to bring some of that blue, and the brown, out to the edge eventually, IF I stick to this arrangement. Have to say tho, I'm liking the zig-zag.

love,
Sandy

ps my apologies to those of you who live in locals that have suffered - and are still suffering - a harsh winter. You may look at us West Coasters with envy, but the downside is we are in the midst of a severe drought that doesn't look like it will end any time soon. So... be thankful of your water, at least. And we'll be thankful of our mild weather ~