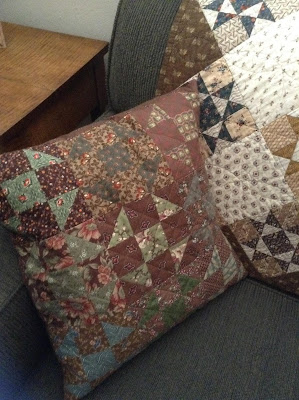
I've been wanting to make a (mainly) blue-and-white quilt for a while, a sampler of some kind, and thought
Lisa Bongean's Triangle Gatherings would be just about perfect. I'm a bit late. She's up to block 40, and I'm just getting started. Above is my version of Block 1.
As you can imagine, 40 plus blocks made up of sixteen triangle squares each is a lot of TSq's (or HST's as most people call them).
Which leads to the topic of the many ways of constructing these little guys. I have to admit I'm still learning new and better ways after all these years, and would like to share some of what I've learned.
Sewing large and trimming to size
This has been my preferred method for many years, as, IMO, it gives you the best results for absolute accuracy. It is a pain, though, meaning a lot of cutting, drawing lines, and trimming. However I have figured out a way to eliminate the line drawing part.
You know those plastic thingies you tape down to your sewing machine after lining them up with a "key" and all that jazz? I bought two different versions, neither of which really ever worked that well for me, plus they cover up the bobbin access on my machine. Why not just use a piece of 1/4" tape.
(btw the scotch tape you see is there to smooth out the bump that annoyingly flips seams the wrong way as they approach the needle, another problem I'm working on)
For a 2" finished Triangle Square, I cut 3" squares and laid a light over a dark, right sides together. Now to the sewing.
First you have to know exactly where to line up the corner where you start. You can see above how the guide on my presser foot bisects that corner.
Now you line up the bottom corner with the right side of the tape. This is where your drawn line would have been.Your guide will be travelling down this imaginary corner-to-corner line. All you have to do is keep the bottom corner lined up with the right side of the tape as it moves toward the needle. Same concept as the plastic thingies.
Now you turn it around and sew on the other side of that imaginary line.
Cut and press open...
and trim.
Perfect Triangle Squares!
Next up,
Thangles
Another method for dang near perfect Triangle Squares.
I like these because you can get 2" finished Triangle Squares from 2 1/2" strips. The problem is, you have to pin them on (or use a little dot of glue stick) to secure the paper, and it all has to be lined up perfect or your resulting square won't be perfect. And then you have to rip the papers off. TIP: make sure you shorten your stitch length when making these, for easier paper removal.
Again, a lot of work. I thought their aught to be an easier way. Which leads me to my latest favorite tool:
Easy Angle
Why bother pinning and ripping papers when you can simply measure and cut?
Again I'm using 2 1/2" strips (or pieces as you see here) for 2" finished Triangle Squares. Line up your first cut as seen above,
and your vertical cut as seen above here.
Note the 2 1/2" mark on the ruler, and the black point which extends over the edge of the fabric.
(btw the ruler doesn't come with a fancy glass knob. I attached that myself for easier handling.)
Now, sew.
I go ahead and line it up with my 1/4" tape, although that's not necessary if you have a 1/4" presser foot, with or without the guide.
Again, if you've been careful with your ruler placement and cutting, your SQ's will come out accurate.
The last thing I'm going to show you is something I just discovered:
SQangles
I saw an ad for these recently in a quilting magazine and thought they might be just the thing when you need to make a whole lot of Triangle Squares at once, such as what I'll be doing for the Triangle Gatherings blocks.
You get several sheets of iron-on transfers in your preferred size, which are re-usable. For the 1 1/2" size (which I'm using for the Triangle Gatherings) one sheet yields 240 Triangle Squares. I got four "good" and a fifth "iffy" transfer from one sheet, or 960+ TSqs. That's from one sheet! What you're looking at above is a partial sheet. Anyway, you sew on the dotted lines, and cut on the solid lines - same method as for Thangles, but no paper to rip. This is by far the fastest method I've used.
As with the previous methods, the resulting accuracy is dependent on
how accurately you do your sewing and cutting. Pretty darn easy in this
case.
I hoping to have provided a decent introduction to these methods, and that some of you might find them useful. Please let me know if you have questions or if something doesn't make sense.
Happy Sewing, everyone!
love,
Sandy


